This lecture is about setting up SAMBA, which enables interaction with SMB-based networks, comprising of Microsoft Windows machines.
We will cover file and print sharing between Windows and Linux over SMB, and discuss the issues of Hebrew in (network) file systems. This lecture focuses on home users. We will not cover using SAMBA in the enterprise, and NT domain controller servers.
Several tools that are not part of SAMBA, but are useful for accessing windows shares will also be shown, including lisa and cups.
You don't need SAMBA, if:
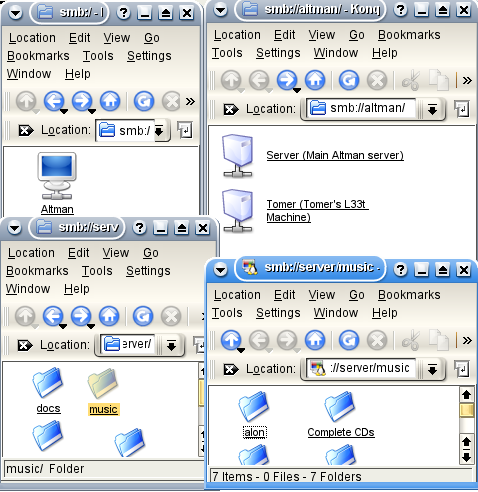
KDE users can use konqueror to browse the local network without hassle. Make sure the smb ioslave for KDE is installed in your distribution, and browse via konqueror to smb:/, and viola! The local network is shown.
In order to use SAMBA, you must first make sure it's installed on your GNU/Linux machine. Use your distribution's package manager to install samba and swat.
SAMBA configuration is done via the file /etc/samba/smb.conf (or /etc/smb.conf depending on your distribution). You can edit this file manually, but it is usually much easier to edit it using SWAT.
SWAT (Samba Web Administration Tool) is a web interface for administering SAMBA. After installing SWAT, make sure it's active by adding the following line to your /etc/inetd.conf:
swat stream tcp nowait.400 root /usr/sbin/tcpd /usr/sbin/swat
Once activated, you can access SWAT at the address http://localhost:901/. SWAT lets you easily modify all of SAMBA's configuration options.
One could use smbclient and nmblookup to browse the local network, but it's much easier to use a GUI browser such as lisa, LinNeigborhood, and gnomba.
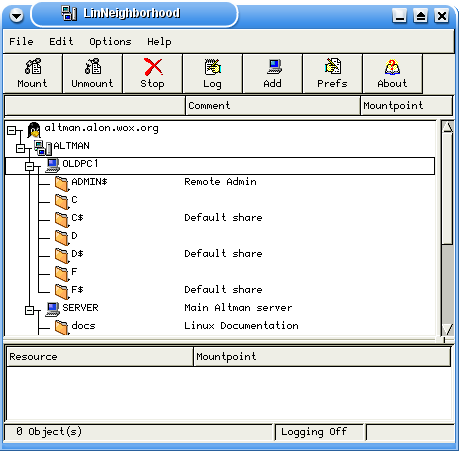
These GUI browsers enable you to easily browse the network. Some of them have easy interfaces to mount and access shares on the servers.
The most basic use of SAMBA as a client is using smbclient which lets you browse and connect to shares on remote machines. Note that SAMBA uses forward slashes (/) instead of the non-standard backslashes(\) used by some other operating system/
The -L flag lists available shares on the server (including "hidden" shares that end with $):
[alon@localhost]$ smbclient -L //server
Password:
Anonymous login successful
Domain=[ALTMAN] OS=[Unix] Server=[Samba 3.0.8-Debian]

        Sharename       Type      Comment
        ---------       ----      -------
        print$          Disk
        docs            Disk      Linux Documentation
        public          Disk      Public Stuff
        morespace       Disk      More Space
        music           Disk      Music
        hp              Printer
        IPC$            IPC       IPC Service (Main Altman server)
        ADMIN$          IPC       IPC Service (Main Altman server)
To connect to a share simply type smbclient sharename. If login is required, specify a user with the -U switch.
[alon@localhost]$ smbclient //server/docs
Password:
Anonymous login successful
Domain=[ALTMAN] OS=[Unix] Server=[Samba 3.0.8-Debian]
smb: \>
smb: \> ls
  .                                   D        0  Thu Jan 20 00:32:43 2005
  ..                                  D        0  Mon Dec 27 08:15:43 2004
  base-files                          D        0  Sun Nov 14 00:46:48 2004
  base-passwd                         D        0  Wed Sep 15 17:07:30 2004
     ... snipped ...
  latex-beamer                        D        0  Thu Jan 20 00:32:43 2005
  pgf                                 D        0  Thu Jan 20 00:32:43 2005

                37078 blocks of size 2097152. 1482 blocks available
smb: \>
smbclient recognizes standard FTP commands such as get and put.
The most general way to access a remote file share is to mount it as a local file system. Samba provides a tool called smbmount to allow a user to mount a remote share without becoming root. Note that this is a security risk, as the smbfs driver is quite unstable and can lead to a system hang.
To mount a remote share, you must first create the mount point, and then run smbmount to mount it. To unmount, use smbumount. The mounted share is accessible as a local file system.
(12:38) altman /home/alon> mkdir mnt
(12:38) altman /home/alon> smbmount //tomer/c$ mnt/
added interface ip=192.168.1.1 bcast=192.168.1.255 nmask=255.255.255.0
Got a positive name query response from 127.0.0.1 ( 192.168.1.3 )
Password:
(12:38) altman /home/alon> cd mnt/
(12:38) altman /home/alon/mnt> ls
    ... [ Directory listing snipped ] ...
(12:38) altman /home/alon/mnt> cd ..
(12:38) altman /home/alon> smbumount mnt/
(12:38) altman /home/alon> ls mnt/
(12:39) altman /home/alon>
To disable smbmount in multi-user systems do (as root):
# chmod a-s /usr/bin/smbmnt
The easiest way to configure samba as a server is to use the SWAT wizard(local link) to create an smb.conf file. You can then fine-tune the settings with SWAT. I will cover here a few important settings, that you would most likely want to set:
The most common samba setup is sharing user's home directories. This is done using the special [homes] share. Other shares may also be defined by specifying additional sections.
The following options are common for shares:
Samba keeps a separate password file than the standard /etc/passwd. This password file can be manipulated using the smbpasswd command, or from Windows. Each user which requires samba access must have a password set up. In order to set up a password, use the smbpasswd command as root:
altman:~# smbpasswd alon
New SMB password:
Retype new SMB password:
altman:~#
It is best to use the same password for your Windows login (if you have one) and for Samba. Once a password is set, the user can change it by using smbpasswd, or from Windows.
Sometimes the names of the users on the client machines are not identical to the names on the server machine. Samba allows you to specify a mapping of windows user names to UNIX user names. To enable mapping set the username map global option to a filename with the mapping. Some distributions have a default filename already assigned. The map file looks like this:
# Unix_name = SMB_name1 SMB_name2 ...
root = administrator admin
nobody = guest pcguest smbguest
alon = a alon
mom = m mom
With share level access, you should either use guest shares, which use the guest account without a password, or specify a user for the share using the user option.
Linux has no character set specification in the file system. Some Hebrew-using systems are configured for utf-8, and some use Unicode (UTF-8). To see what charset your system is using, use the locale command. If neither is specified, you're using utf-8.
To add Hebrew support when mounting a samba file system do:
For utf-8:
$ smbmount //server/music mnt/ -o iocharset=iso8859-8,codepage=cp862
For Unicode:
$ smbmount //server/music mnt/ -o iocharset=utf8,codepage=cp862
The Samba server uses Unicode over the wire when speaking with Windows clients and a DOS codepage when speaking with DOS or other Samba clients. To configure the samba server for Hebrew, add the following configuration options to the [global] section of your Samba configuration:
dos charset = 862
unix charset = utf-8
Replace utf-8 with UTF-8 for a Unicode-based system.
If you have FAT file systems on your Samba server, make sure to mount these file systems with the correct iocharset option (modify the /etc/fstab file accordingly).
Printing in modern GNU/Linux distributions is done via the Common Unix Printing System (CUPS). CUPS supports Samba as a backend, and Samba supports printing via CUPS.
In Windows, a printer is viewed as a device that requires a proprietary driver in order to produce a print file that is then sent to the printer. The driver has a GUI and thus must be run on a client (Windows) machine with a graphical interface. In a network environment this print file is then uploaded to a special printer share on the server for spooling, and then sent to the printer by the server. A separate hidden share is setup on the server with the driver binaries for various architectures and Windows versions, that is used when installing the printer.
Conversely, In the standard UNIX protocols, a printer is assumed to understand the universal printer language - PostScript. Most high-end printers understand PostScript directly, and do not require any additional drivers to be used. Low-end "personal" printers most of us have at home, however, are designed to run with proprietary drivers, and thus do not understand PostScript. Cups handles this by using GhostScript to convert the PostScript document to a bitmap and/or to a printer-specific format. This conversion is done on the SERVER, right before the access to the device. Therefore, when UNIX shares printers, they all talk PostScript.
It is easy to configure CUPS to use a printer shared by a Windows system. Simply use the CUPS web-interface on http://localhost:631/ and add a printer with URL smb://server/share. A driver must be then setup as usual.
TIP: If possible, it's usually easier to first setup the printer locally by physically connecting it to the Linux machine and then when everything works OK, move it to the Windows machine and change the URL.
So, how do you make Windows talk with our server? There are three ways: